مرحبا اصدقائب الاعزاء اقدم لكم اليوم سكربتات جاهزة لبرمجة ميكروتك بالكامل
طبعا الرجااااااء الانتباه الى الاي بيات وفيما يلائمك وتغيرها الى المطلوب لك
نفترض ان الوان هو 10.0.0.1 و الاي بي الداخلي هو 192.168.0.1
/ interface
set ether1 name=lan
set ether2 name=wan
/ ip address
add address=192.168.0.1/24 network=192.168.0.0 broadcast=192.168.0.255 interface=lan
add address=10.0.0.2/24 network=10.0.0.0 broadcast=10.0.0.255 interface=wan
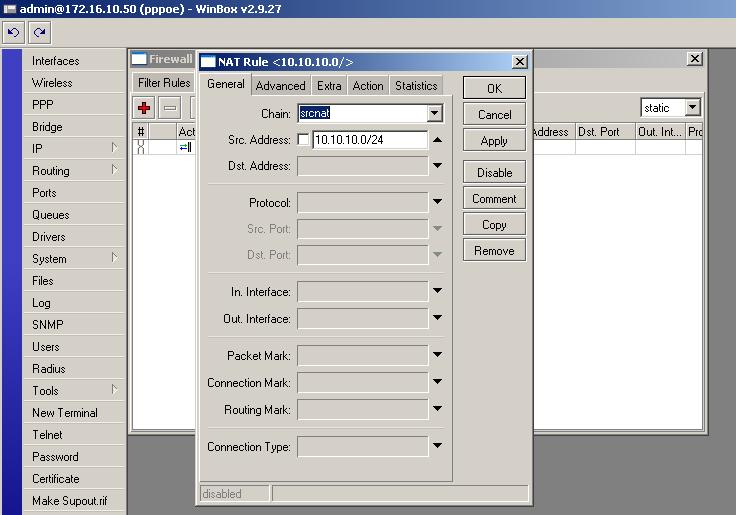
/ ip firewall nat
add chain=srcnat out-interface=wan action=masquerade comment="NAT to wan" disabled=no
/ ip upnp interfaces
add interface=wan type=external
add interface=lan type=internal
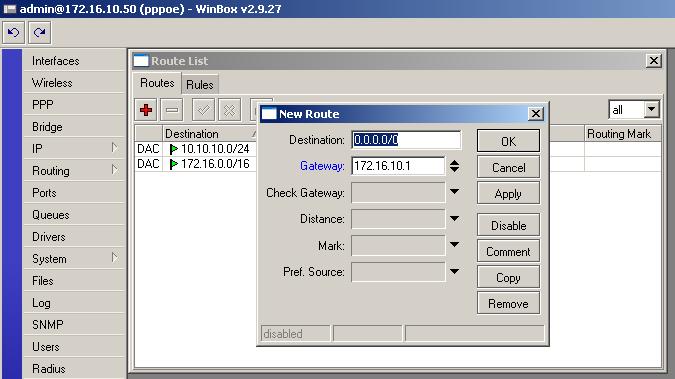
/ ip route
add dst-address=8.0.0.0/8 gateway=192.168.0.1 distance=1 scope=255 \
target-scope=10 comment="INTERNATIONAL SITES" disabled=no
add dst-address=16.0.0.0/8 gateway=192.168.0.1 distance=1 scope=255 \
target-scope=10 comment="INTERNATIONAL SITES" disabled=no
add dst-address=32.0.0.0/8 gateway=192.168.0.1 distance=1 scope=255 \
target-scope=10 comment="INTERNATIONAL SITES" disabled=no
add dst-address=64.0.0.0/8 gateway=192.168.0.1 distance=1 scope=255 \
target-scope=10 comment="INTERNATIONAL SITES" disabled=no
add dst-address=96.0.0.0/8 gateway=192.168.0.1 distance=1 scope=255 \
target-scope=10 comment="INTERNATIONAL SITES" disabled=no
add dst-address=128.0.0.0/8 gateway=192.168.0.1 distance=1 scope=255 \
target-scope=10 comment="INTERNATIONAL SITES" disabled=no
add dst-address=207.0.0.0/8 gateway=192.168.0.1 distance=1 scope=255 \
target-scope=10 comment="MICROSOFT" disabled=no
add dst-address=208.65.0.0/16 gateway=192.168.0.1 distance=1 scope=255 \
target-scope=10 comment="YOUTUBE" disabled=no
add dst-address=208.67.0.0/16 gateway=192.168.0.1 distance=1 scope=255 \
target-scope=10 comment="GOOGLE" disabled=no
add dst-address=209.0.0.0/28 gateway=192.168.0.1 distance=1 scope=255 \
target-scope=10 comment="ORKUT" disabled=no
/ ip route
add dst-address=8.0.0.0/8 gateway=10.0.0.1 distance=1 scope=255 \
target-scope=10 comment="INTERNATIONAL SITES" disabled=no
add dst-address=16.0.0.0/8 gateway=10.0.0.1 distance=1 scope=255 \
target-scope=10 comment="INTERNATIONAL SITES" disabled=no
add dst-address=32.0.0.0/8 gateway=10.0.0.1 distance=1 scope=255 \
target-scope=10 comment="INTERNATIONAL SITES" disabled=no
add dst-address=64.0.0.0/8 gateway=10.0.0.1 distance=1 scope=255 \
target-scope=10 comment="INTERNATIONAL SITES" disabled=no
add dst-address=96.0.0.0/8 gateway=10.0.0.1 distance=1 scope=255 \
target-scope=10 comment="INTERNATIONAL SITES" disabled=no
add dst-address=128.0.0.0/8 gateway=10.0.0.1 distance=1 scope=255 \
target-scope=10 comment="INTERNATIONAL SITES" disabled=no
add dst-address=207.0.0.0/8 gateway=10.0.0.1 distance=1 scope=255 \
target-scope=10 comment="MICROSOFT" disabled=no
add dst-address=208.65.0.0/16 gateway=10.0.0.1 distance=1 scope=255 \
target-scope=10 comment="YOUTUBE" disabled=no
add dst-address=208.67.0.0/16 gateway=10.0.0.1 distance=1 scope=255 \
target-scope=10 comment="GOOGLE" disabled=no
add dst-address=209.0.0.0/28 gateway=10.0.0.1 distance=1 scope=255 \
target-scope=10 comment="ORKUT" disabled=no
اعداد الكاش
/ ip firewall nat
add chain=dstnat dst-port=80 protocol=tcp action=redirect to-ports=3128 comment="PROXY REDIRECTION" disabled=no
/ ip web-proxy
set enabled=yes src-address=0.0.0.0 port=3128 hostname="proxy" transparent-proxy=yes parent-proxy=0.0.0.0:0 cache-administrator="webmaster" max-object-size=4096KiB cache-drive=system max-cache-size=380000KiB max-ram-cache-size=64000KiB
/ ip web-proxy access
add dst-port=23-25 action=deny comment="block telnet & spam e-mail relaying" disabled=no
/ip firewall filter
add chain=input dst-port=3128 protocol=tcp in-interface=wan action=drop comment="EXTERNAL PROXY BLOCK" disabled=no
تحديد سرعة برامج p2p والضارة جدا خليتها لكم 1 كيلو تحميل 1 كيلو رفع
/ ip firewall mangle
add chain=prerouting p2p=all-p2p action=mark-connection new-connection-mark=p2p_conn passthrough=yes comment="MARK P2P" disabled=no
add chain=prerouting connection-mark=p2p_conn action=mark-packet new-packet-mark=p2p passthrough=yes comment="" disabled=no
/ queue tree
add name="P2P-Down" parent=global-in packet-mark=p2p limit-at=0 queue=default priority=8 max-limit=1000 burst-limit=0 burst-threshold=0 burst-time=0s disabled=no
add name="P2P-Up" parent=global-out packet-mark=p2p limit-at=0 queue=default priority=8 max-limit=1000 burst-limit=0 burst-threshold=0 burst-time=0s disabled=no
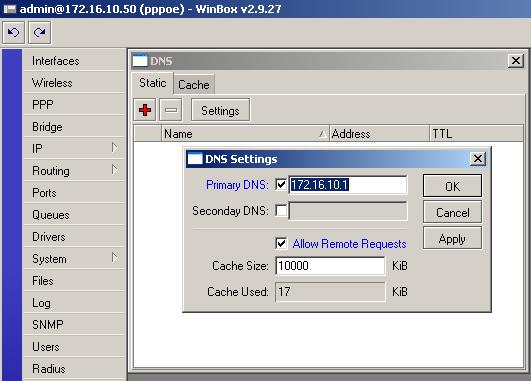
اعداد dns وركزو تغيرو الاي بي الى الدي ان اس الخاص ب isp الخاص بك او الي ماخذ منه خط باك بون
/ ip dns set primary-dns=111.111.111.111
/ ip dns set secondary-dns=222.222.222.222
اعداد الفايرول فلتر
/ ip firewall filter
add chain=forward protocol=tcp connection-limit=25,32 limit=1,5 action=drop comment="LIMIT USER CONECTION TO 25" disabled=no
add chain=input connection-state=invalid action=drop comment="DROP INVALID CONNECTIONS" disabled=no
add chain=customer connection-state=invalid action=drop comment="DROP INVALID CONNEECTION PACKETS" disabled=no
add chain=customer connection-state=established action=accept comment="ALLOW ESTABLISHED CONNECTIONS" disabled=no
add chain=customer connection-state=related action=accept comment="ALLOW RELATED CONNECTIONS" disabled=no
add chain=customer action=log log-prefix="customer_drop" comment="LOG DROPPED CONNECTIONS" disabled=no
add chain=forward protocol=tcp src-port=135-139 action=drop comment="NETBEUI" disabled=no
add chain=customer action=drop comment="DROP AND LOG EVERYTHING ELSE" disabled=no
add chain=forward protocol=tcp dst-port=3306 action=drop comment="VIRUS" disabled=no
add chain=forward protocol=tcp dst-port=1025 action=drop comment="" disabled=no
add chain=forward protocol=tcp p2p=winmx connection-limit=10,32 limit=1,3 action=drop comment="P2P" disabled=no
add chain=forward protocol=tcp p2p=warez connection-limit=10,32 limit=1,3 action=drop comment="" disabled=no
add chain=forward protocol=tcp p2p=bit-torrent connection-limit=10,32 limit=1,3 connection-state=new action=drop comment="" disabled=no
add chain=forward protocol=tcp p2p=edonkey connection-limit=10,32 limit=1,3 connection-state=new action=drop comment="" disabled=no
add chain=forward protocol=tcp p2p=gnutella connection-limit=10,32 limit=1,3 action=drop comment="" disabled=no
add chain=forward protocol=tcp p2p=fasttrack connection-limit=10,32 limit=1,3 action=drop comment="" disabled=no
add chain=forward protocol=tcp p2p=fasttrack connection-limit=10,32 limit=1,3 action=drop comment="" disabled=no
add chain=forward protocol=tcp p2p=direct-connect connection-limit=10,32 limit=1,3 action=drop comment="" disabled=no
add chain=forward protocol=tcp p2p=blubster connection-limit=10,32 limit=1,3 action=drop comment="" disabled=no
add chain=forward protocol=tcp tcp-flags=fin,syn,rst,ack limit=1,5 action=accept comment="" disabled=no
add chain=input protocol=tcp tcp-flags=fin,syn,rst,ack limit=1,5 action=accept comment="SYN-FLOOD" disabled=no
add chain=input protocol=icmp icmp-options=8:0 limit=1,5 action=accept comment="DOS ATTACK" disabled=no
add chain=forward protocol=icmp icmp-options=8:0 limit=1,5 action=accept comment="" disabled=no
add chain=output protocol=icmp connection-state=invalid action=drop comment="TRANSLATION NAT BUG" disabled=no
add chain=input protocol=tcp psd=21,3s,3,1 action=add-src-to-address-list address-list="pscanners" address-list-timeout=2w comment="PORT SCANNERS TO LIST" disabled=no
add chain=input protocol=tcp tcp-flags=fin,!syn,!rst,!psh,!ack,!urg action=add-src-to-address-list address-list="pscanners" address-list-timeout=2w comment="NMAP FIN STEALTH" disabled=no
add chain=input protocol=tcp tcp-flags=fin,syn action=add-src-to-address-list address-list="pscanners" address-list-timeout=2w comment="SYN/FINn" disabled=no
add chain=input protocol=tcp tcp-flags=syn,rst action=add-src-to-address-list address-list="pscanners" address-list-timeout=2w comment="SYN/RST" disabled=no
add chain=input protocol=tcp tcp-flags=fin,psh,urg,!syn,!ack action=add-src-to-address-list address-list="pscanners" address-list-timeout=2w comment="FIN/PSH/URG" disabled=no
add chain=input protocol=tcp tcp-flags=fin,syn,rst,psh,ack,urg action=add-src-to-address-list address-list="pscanners" address-list-timeout=2w comment="ALL/ALL" disabled=no
add chain=input protocol=tcp tcp-flags=!fin,!syn,!rst,!psh,!ack,!urg action=add-src-to-address-list address-list="pscanners" address-list-timeout=2w comment="NMAP NULL" disabled=no
add chain=input src-address-list="pscanners" action=drop comment="DROPPING PORT SCANNERS" disabled=no
add chain=forward protocol=tcp dst-port=0 action=drop comment="REX VIRUS" disabled=no
add chain=forward protocol=tcp dst-port=12345 action=drop comment="NETBUS" disabled=no
اعداد dhcp server
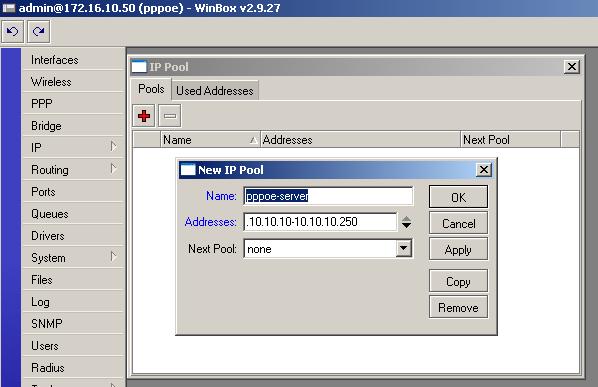
/ ip pool
add name="pool_clients" ranges=192.168.0.10-192.168.0.240
/ ip dhcp-server
add name="dhcp_clients" interface=lan lease-time=1d address-pool=pool_clients bootp-support=static authoritative=after-2sec-delay add-arp=yes disabled=no
/ ip dhcp-server network
add address=192.168.0.0/24 gateway=192.168.0.1 netmask=24 dns-server=111.111.111.111,222.222.222.222 comment="DHCP Server Range"
/ ip dhcp-server
config set store-leases-disk=5m
حجب اجهزة الزبون من الاتصال باجهزة الزبون الاخرى على كل البورتات
/ ip firewall filter
add chain=forward src-address=192.168.0.0/24 dst-address=192.168.0.0/24 action=drop comment="Block client to client traffic in all ports" disabled=no
تحويل كامل ترفك الزبون الى الوان
/ ip route
add dst-address=0.0.0.0/0 gateway=10.0.0.1 scope=255 target-scope=10 routing-mark=Route_wan comment="Market packets redirect to port Route_wan" disabled=no
/ ip firewall mangle
add chain=prerouting protocol=tcp action=mark-routing new-routing-mark=Route_wan passthrough=yes in-interface=lan comment="Redirect port to Route_wan" disabled=no
add chain=prerouting routing-mark=Route_wan action=mark-packet new-packet-mark=Route_wan passthrough=yes comment="Market packets to Route_wan" disabled=no
/ interface ethernet
set wan name="wan" arp=proxy-arp comment="" disabled=no
/ ip firewall nat
add chain=dstnat action=redirect to-ports=3128 src-address=!210.220.230.0 dst-port=80 protocol=tcp comment="PROXY-WEB/JUMP VALID IP" disabled=no
add chain=dstnat action=passthrough src-address=210.220.230.0/24 comment="VALID IP TO CLIENTS" disabled=no
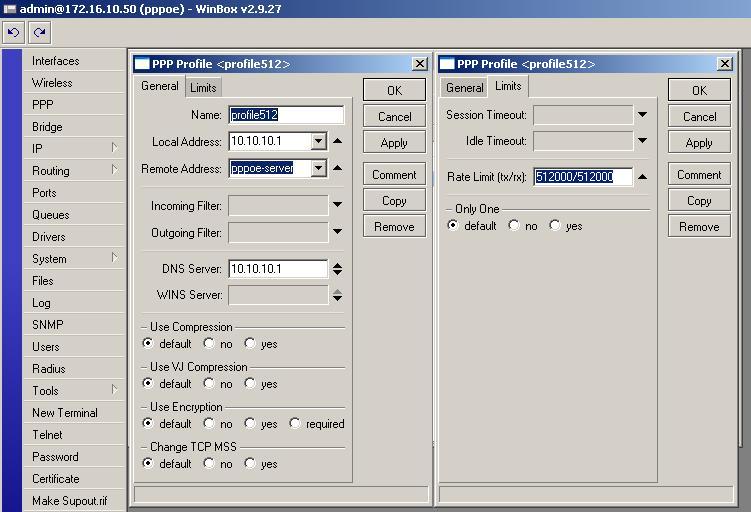
/ ppp profile
add name="pppoe_palmcse_128K_256K" use-compression=no use-vj-compression=no use-encryption=no only-one=yes change-tcp-mss=yes rate-limit=128k/256k dns-server=111.111.111.111,222.222.222.222 comment=""
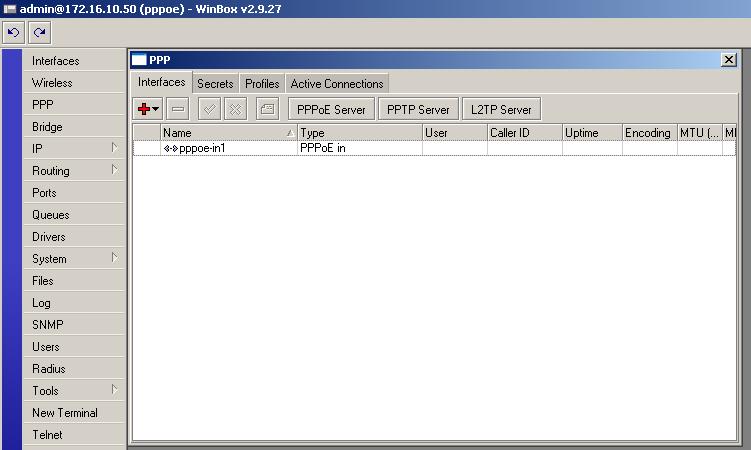
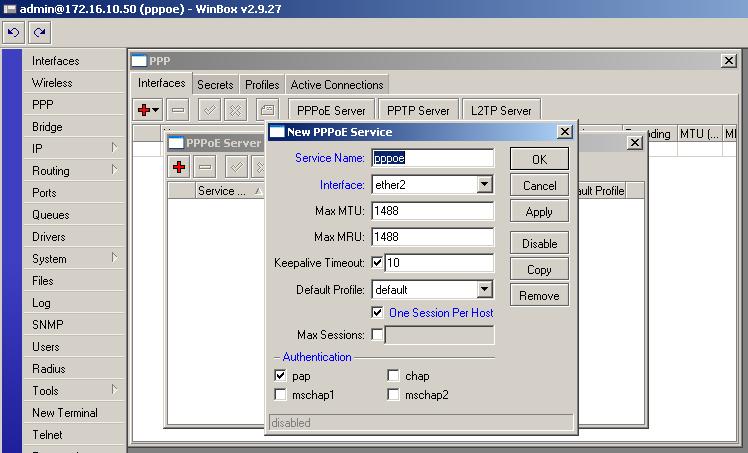
/ interface pppoe-server server
add service-name="pppoe_server" interface=wan max-mtu=1480 max-mru=1480 authentication=pap,chap,mschap1,mschap2 keepalive-timeout=10 one-session-per-host=yes max-sessions=0 default-profile= pppoe_palmcse_128K_256K disabled=no
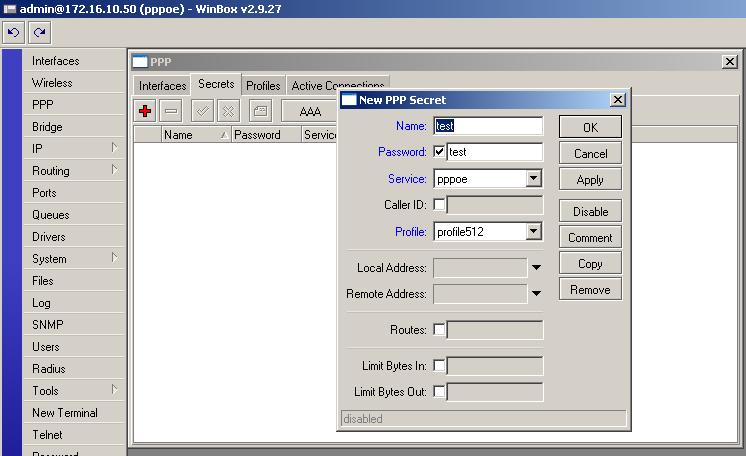
/ ppp secret
add name="palmcse" service=pppoe password="test" profile= pppoe_palmcse_128K_256K remote-address=210.220.230.240 routes="" limit-bytes-in=0 limit-bytes-out=0 comment="" disabled=no
اعداد اليوزر منجر ولكن ركزو على هاي الامور
#USER MANAGER ACTIVE SESSIONS LIMITED AT:
#SIMULTANEOUS USE: L3=10 L4=10 L5=10 L6=UNLIMITED IN 2.9 VERSION
#SIMULTANEOUS USE: L3=10 L4=20 L5=50 L6=UNLIMITED IN 3.X VERSION
#READ MORE AT License levels - MikroTik Wiki
/ radius add called-id="" domain="" address=10.0.0.1 secret="123456" authentication-port=1812 accounting-port=1813 timeout=300ms accounting-backup=no realm="" comment="" disabled=no
/ radius incoming set accept=yes port=1700
/ ppp aaa set use-radius=yes accounting=yes interim-update=10s
/ radius add service=ppp address=10.0.0.1 secret="123456"
/ ip hotspot profile set hsprof1 use-radius=yes
/ radius add service=hotspot address=10.0.0.1 secret="secretkey"
/ radius add service=hotspot
/ tool user-manager customer add login=admin password=pass123 permissions=owner
/ tool user-manager customer add subscriber=admin login="clients" password="pass123" permissions=read-write comment="" disabled=no
/ tool user-manager router add subscriber=admin name="ServerNET" ip-address=10.0.0.1 shared-secret="123456" log=auth-ok,auth-fail,acct-ok,acct-fail comment="" disabled=no
لاضافة يوزر عن طريق اليوزر منجر
/ tool user-manager user add subscriber=admin name="palmcse" password="test" pool-name="pppoe" group-name="100k/256k" comment="" disabled=no
لتغير سرعة اليوزر بعد منتصف اليل
system scheduler add name=SpeedLeftMidnight start-date=feb/13/1977 start-time=01:30:00 interval=24:00:00 on-event="ppp profile set 100k/256k rate-limit=384k/384k
/queue tree set P2P-Down max-limit=256000
/queue tree set P2P-Up max-limit=256000"
لتنظيف البروكسي سيرفر او الكاش كل 3 ايام
/ system script
add name="proxyclear" source=":log info \"Cleaning web-proxy\" \n
/ ip web-proxy set enabled=no \n
:delay 60s \n
/ ip web-proxy clear-cache \n
:delay 60s \n
/ ip web-proxy set enabled=yes \n
:log info \"Clear web-proxy done\"
\n" \policy=ftp,reboot,read,write,policy,test,winbox,p assword
/ system scheduler
add name="palmcse_proxyclear" on-event=proxyclear start-date=feb/13/1977 start-time=04:10:00 interval=72:00:00 comment="" disabled=no
سكربت لاخذ باك اب يومي
/ system script
add name="abackup" source="/sys bac sa name=\(\[/sys id g na\] . \"_\" . \
\[:pick \[/sys cl g da\] 7 11\] . \[:pick \[/sys cl g da\] 0 3\] . \[:pick \
\[/sys cl g da\] 4 6\]\)\n
\n/ export file=\(\[/sys id g na\] . \"_\" . \
\[:pick \[/sys cl g da\] 7 11\] . \[:pick \[/sys cl g da\] 0 3\] . \[:pick \
\[/sys cl g da\] 4 6\]\)" \
policy=ftp,reboot,read,write,policy,test,winbox,pa ssword
/ system scheduler
add name="palmcse_abackup" on-event="abackup" interval=24:00:00 start-time=23:59:30 comment="Auto backup script"
سكربت لعمل ربوت او اعادة تشغيل تلقائية كل 3 ايام لمن يحب يعدل بالي يريحة
/ system script
add name="areboot" source="/system reboot" \ policy=ftp,reboot,read,write,policy,test,winbox,pa ssword
/ system scheduler
add name="m4d3_areboot" on-event="areboot" interval=72:00:00 start-time=02:00:00 comment="Auto reboot script"
سكربت لتحديد سرعة youtube الى 150 كيلو فقط
/ ip firewall address-list
add list=youtube address=64.0.0.0/8 comment="YOUTUBE" disabled=no
add list=youtube address=72.0.0.0/8 comment="" disabled=no
add list=youtube address=84.0.0.0/8 comment="" disabled=no
add list=youtube address=208.65.153.224/27 comment="" disabled=no
add list=youtube address=209.85.239.0/24 comment="" disabled=no
/ ip firewall mangle
add chain=prerouting action=mark-connection new-connection-mark=youtube_conn passthrough=yes src-address-list=youtube comment="YOUTUBE traffic" disabled=no
add chain=prerouting action=mark-packet new-packet-mark=youtube passthrough=yes connection-mark=youtube_conn comment="" disabled=no
/ queue tree
add name="YOUTUBE" parent=global-total packet-mark=youtube limit-at=0 queue=default priority=7 max-limit=150000 burst-limit=0 burst-threshold=0 burst-time=0s disabled=no
/ ip route
add dst-address=64.0.0.0/8 gateway=10.0.0.1 distance=1 scope=255 target-scope=10 comment="YOUTUBE" disabled=no
add dst-address=72.0.0.0/8 gateway=10.0.0.1 distance=1 scope=255 target-scope=10 comment="YOUTUBE" disabled=no
add dst-address=84.0.0.0/8 gateway=10.0.0.1 distance=1 scope=255 target-scope=10 comment="YOUTUBE" disabled=no
add dst-address=208.65.153.224/27 gateway=10.0.0.1 distance=1 scope=255 target-scope=10 comment="YOUTUBE" disabled=no
add dst-address=209.85.239.0/24 gateway=10.0.0.1 distance=1 scope=255 target-scope=10 comment="YOUTUBE" disabled=no


